

It took place in a campground in the Blue Ridge Mountains on a Saturday afternoon. In an instant, our picnic table was perfectly covered by our canopy, protecting our lunch spread from the midday sun. The next time a gust hit, everything was in the air, spinning across the campsite, striking a nearby tent, and landing upside down in a mud patch some thirty feet away.
Thankfully, no one was harmed. However, our meal was coated in pine needles, the canopy fabric was torn, and two of the frame legs were bent. The entire disaster could have been avoided. Simply put, we hadn’t fully fastened the canopy before the wind started to blow.
This guide is for you if you’ve ever experienced a similar experience or if you want to make sure you never do. We’ll go over everything, including why canopies attract wind, how to secure them on various surfaces, what hardware is worth purchasing, and the common mistakes made by campers without even realizing it.
Why Canopies Are So Vulnerable to Wind
It is helpful to understand the issue before moving on to solutions. In essence, a canopy tent is a large, level surface raised many feet above the ground. In terms of aerodynamics, that sail is almost ideal. In addition to pushing a canopy sideways, wind may create lift, get underneath it, and instantly turn a 20-pound tent into a projectile.
As the wind angle changes, the physics gets worse. A gust approaching at a 45-degree angle to the canopy face is significantly more damaging than one going straight at it because it exerts rotational force that twists the frame instead of pushing it equally. Most consumer-grade canopy frames aren’t built to withstand that much torque, which is why legs buckle and corner joints fail.
Three factors influence how wind-resistant your canopy structure is: the quality of the frame, how well you anchored it to the ground, and if you employed sidewalls or guy lines to spread wind stress. We will cover all three.
Step 1: Read the Wind Before You Set Up
The greatest canopy anchoring begins before you open the bag. When you arrive at your campsite, spend two minutes observing the wind. Where does it come from? Is it consistent or gusty? Are there any natural windbreaks nearby—trees, hills, or other structures—that you can take advantage of?
Position your canopy with the thinnest edge facing the prevailing wind. A 10×10 canopy has the same footprint from every aspect, but if you’re using it as a 10×20, orient it so the 10-foot face faces the wind rather than the 20-foot side. This reduces your wind-catching surface area by half.
If possible, position your canopy in the lee (downwind) of a natural windbreak. Even a row of trees 20 feet upwind can significantly lessen the wind that reaches your canopy. This does not substitute appropriate anchoring, but it does make all other measures more effective.
Pro Tip: Check the weather forecast before your trip and focus on wind speeds, not simply rain. A sunny day with gusts of 25 mph or more is significantly more risky for canopy stability than a moderate shower with no wind.
Step 2: Stake It Down — Every Single Corner
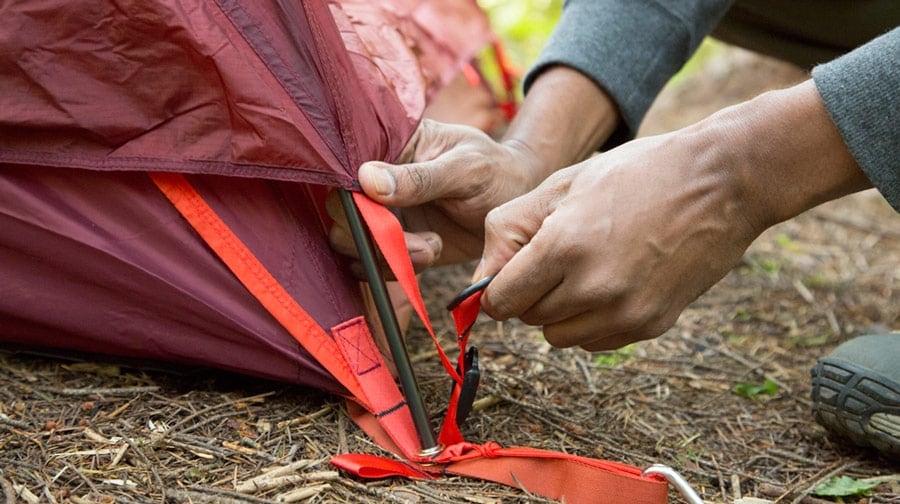
This may seem apparent, but you’d be shocked how many people avoid staking because the ground is hard, they’re in a rush, or it’seems alright’ under calm weather. Every corner of your canopy must be staked, without exception.
Most consumer canopies come with decorative stakes. They’re thin, lightweight, and budget-friendly. If there is a lot of wind, replace them with suitable tent stakes before your journey.
Best Stake Types by Ground Condition
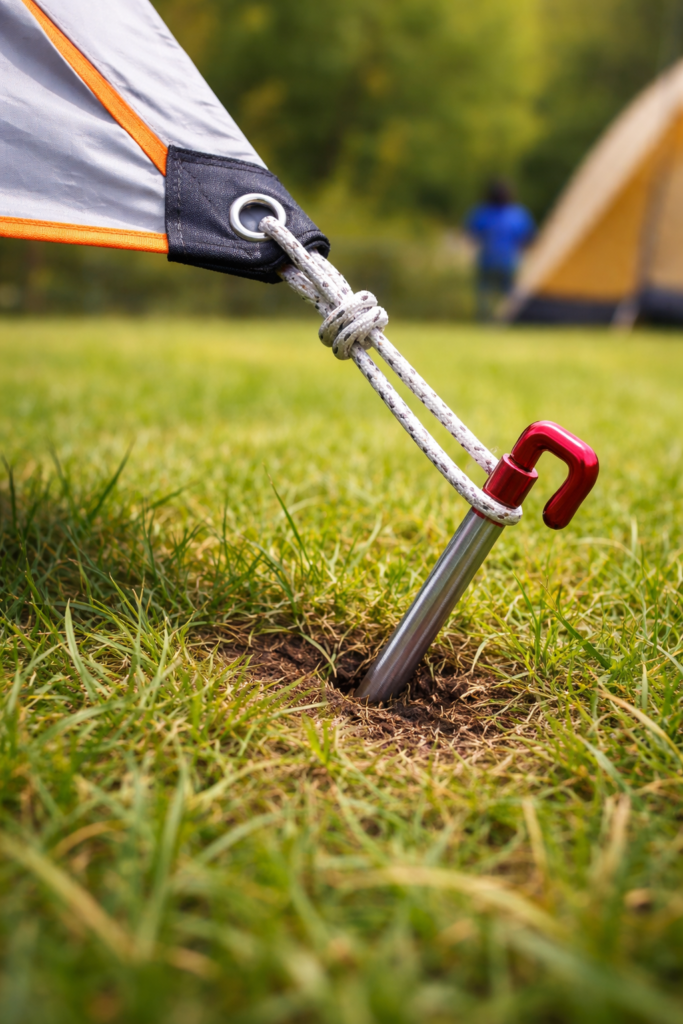
- Soft soil / grass: Use 10–12 inch heavy-duty steel tent stakes with a J-hook or shepherd’s hook design. Drive them at a 45-degree angle away from the canopy for maximum holding power.
- Hard or rocky ground: Use screw-in auger stakes (also called spiral stakes). These twist into the ground rather than needing to be hammered, and they grip hard soil far better than straight stakes.
- Sand / beach: Use sand anchors or deadman anchors — wide, flat stakes that are buried horizontally and rely on surface area rather than depth. Never use thin straight stakes in sand; they pull out instantly.
- Concrete / asphalt / pavement: You can’t stake at all — jump ahead to the weight bag and ballast section below.
When staking, pass the stake through the loop or grommet at the canopy’s corner leg, not merely the canopy skirt. The corner leg serves as the structural anchor point, whereas the skirt is made of cloth and will break under strain.
💡 Pro Tip: After driving each stake, test it with a sharp tug. If it pulls out with moderate power, it has to be deeper, or a new stake type is required for the ground condition.
Step 3: Use Weight Bags on Every Leg
Stakes are sufficient in moderate conditions, but weight bags are required for strong wind resistance, particularly on hard surfaces where staking is impossible. These are heavy-duty bags (typically made of polyester or nylon) suspended from each leg of the canopy frame and filled with sand, gravel, or water.
Most reputable canopy manufacturers sell custom-made weight bags for their frames. A correctly packed weight bag on each leg provides 20-40 pounds of downward force, making the canopy significantly more difficult to raise. For a 10×10 canopy with four legs, that may be an additional 80-160 pounds of ballast.
DIY Weight Bag Alternatives
If you don’t have purpose-made weight bags, here are alternatives that actually work:
- Water jugs (1-gallon): Fill them at the campsite tap and hang them from each leg. One gallon = 8.3 lbs. Two jugs per leg = about 16 lbs — not as much as commercial bags, but meaningful.
- Rock-filled stuff sacks: Collect rocks at the campsite, fill a stuff sack, and tie it to the leg. Free and surprisingly effective.
- Coolers and gear boxes: Place heavy gear boxes or a full cooler at the base of each leg. The weight keeps legs from sliding outward.
⚠️ Warning: Never fill weight bags with dirt that you’ve dug from the campsite. Many campgrounds prohibit ground disturbance, and loose dirt also washes out easily and makes a mess.
Step 4: Guy Lines — The Most Underused Canopy Accessory
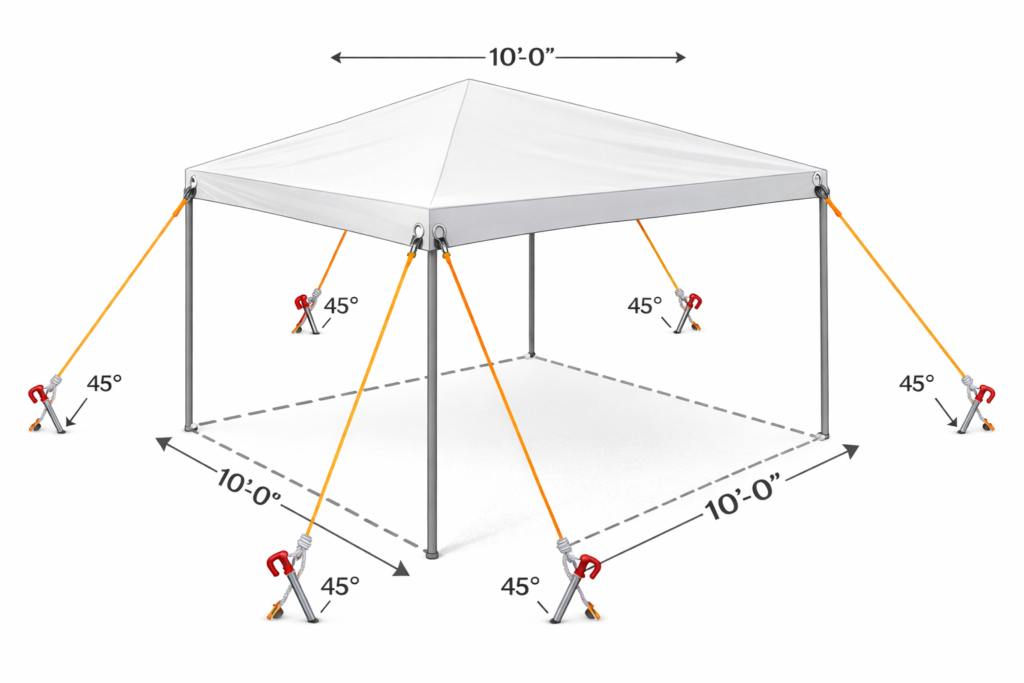
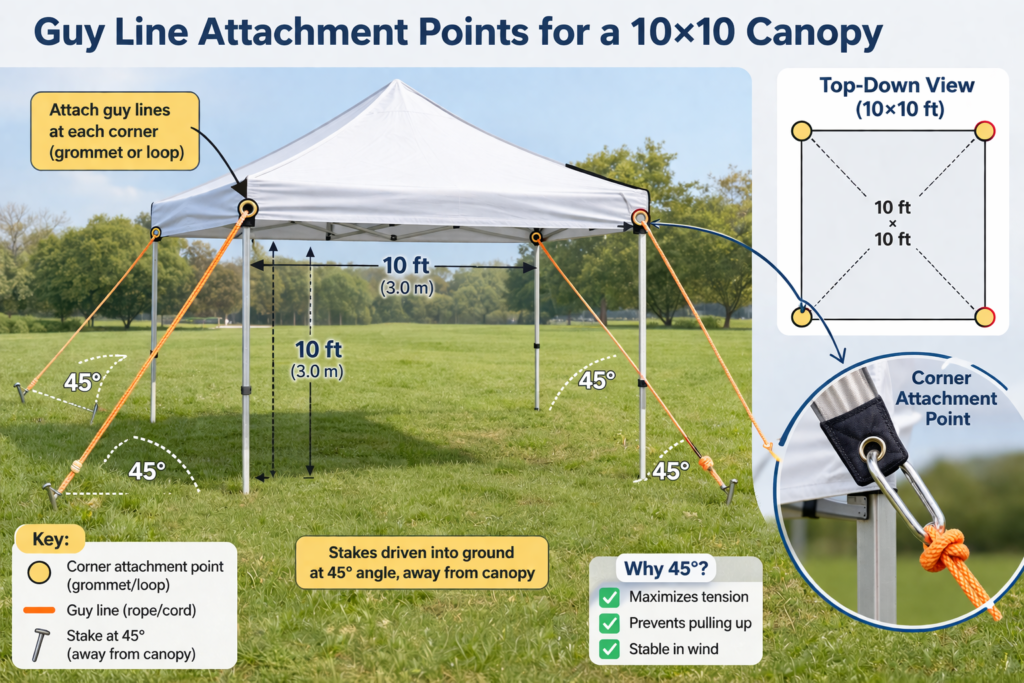
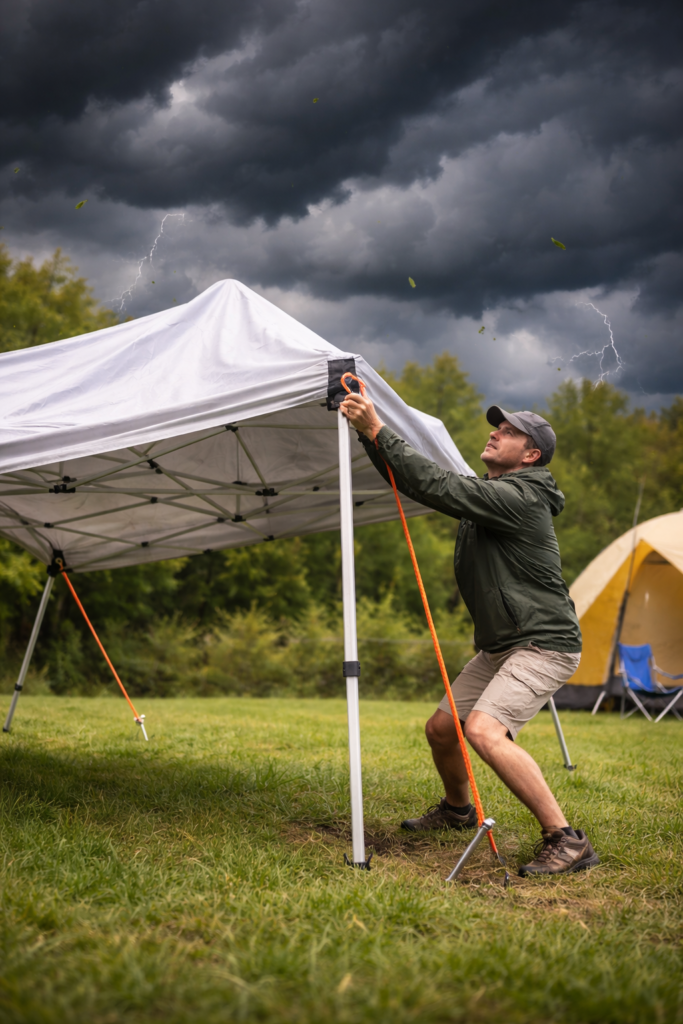
Guy lines are thin ropes that extend diagonally from the canopy’s top corners (or frame) to posts in the ground around its circumference. Consider them the rigging on a sailing ship: they transmit tension outward and keep the structure from bending under pressure.
Most campers never use man lines since they did not receive their canopy and are unaware that they are missing something. However, professional event canopy configurations always include guy lines, and for good reason: they can quadruple the wind resistance of an otherwise well-staked canopy.
To add guy lines to a standard camping canopy:
- Attach a small carabiner or loop of webbing to the upper frame joint at each corner.
- Run a 6–8 foot length of paracord or guy line cord from each carabiner diagonally downward at roughly 45 degrees.
- Drive a stake into the ground at the cord’s end point (about 3–4 feet outside the canopy’s footprint).
- Tension the cord with a line tensioner (the small plastic or aluminum adjuster that slides along the cord) until the cord is taut but not rigid.
- Repeat for all four corners, and optionally for the midpoints of each side on larger canopies.
💡 Pro Tip: Use brightly coloured paracord or small reflective tags on your guylines. Guy wires are renowned accident risks in low light—a bright cord prevents a sprained ankle at 2 a.m.
Step 5: Add Sidewalls (Strategically)
Sidewalls can be a double-edged sword in windy weather. On the one hand, they guard against horizontal rain and provide structure. On the other hand, a fully enclosed canopy attracts more wind and puts more strain on the frame and anchors.
The smart approach is selective sidewall use:
- Upwind side: Leave it open or use a mesh wall. Solid walls on the upwind side create pressure buildup inside the canopy.
- Downwind and side walls: These can be solid, since wind isn’t hitting them directly.
- In severe winds: Remove all sidewalls entirely and rely solely on the canopy top. This reduces wind load by 40–60%.
Also, examine how your sidewalls attach. Sidewalls that clip or tie directly to the frame transmit wind force into the structure. Those that drape loosely and stake independently at the bottom distribute the load more effectively.
Step 6: Adjust Frame Height
In windy conditions, lower the canopy’s height setting. This is a tip that many people overlook. Almost every pop-up canopy has adjustable leg height, typically in three places. In calm weather, set it to full height for optimal headroom. In the wind, set it to the middle or even the lowest setting.
This lowers the canopy’s center of gravity and minimizes its sail area (smaller profile). It also reduces the lever arm that wind forms while pushing against the canopy top, resulting in less torque on the frame joints and anchor points. A canopy at 6 feet in a 30 mph wind is noticeably more stable than the identical canopy at 8 feet.
Step 7: Know When to Take It Down
Above a certain wind speed, no amount of anchoring makes a camping canopy safe to leave up. Most consumer-grade 10×10 pop-up canopies have a sustained wind rating of 25-30 mph. Above that speed, even well-anchored canopies will break frames, tear fabric, and become deadly.
If a storm is approaching or persistent winds are expected to exceed 25 mph, take your canopy down. It takes five minutes. A shattered canopy frame takes much longer to repair, and a canopy that becomes a projectile can badly injure someone.
Before every trip, seek up the canopy manufacturer’s wind rating. Most reputable manufactures report this (usually labeled as ‘maximum wind speed’ or ‘wind resistance’). Budget canopies frequently have no stated rating, which indicates how much testing they’ve done.
⚠️ Warning: Never leave a canopy up unattended in windy or fluctuating winds, even if it appears stable. Wind conditions vary quickly outside, and a canopy that was good at 3pm may be airborne by 4pm.
Quick-Reference Wind Anchoring Checklist
Before you’re satisfied with your canopy setup, run through this list:
- ✅ Narrowest edge faces prevailing wind: Yes / No
- ✅ All 4 corner legs staked with appropriate stakes for ground type: Yes / No
- ✅ Stakes driven at 45-degree angle away from canopy: Yes / No
- ✅ Weight bags on all legs (especially on hard surfaces): Yes / No
- ✅ Guy lines attached at all 4 corners and tensioned: Yes / No
- ✅ Sidewalls adjusted for wind direction: Yes / No
- ✅ Frame height lowered if winds are forecast above 15 mph: Yes / No
- ✅ Wind forecast checked and take-down threshold identified: Yes / No
Frequently Asked Questions
Q. How much wind can a camping canopy withstand?
A: When properly staked, most consumer-grade pop-up canopies can withstand gusts ranging from 15 to 30 mph. Commercial-grade canopies with steel frames and proper anchoring can withstand winds of more than 40 mph. Always check the manufacturer’s rating for your specific canopy, and err on the side of pulling it down early—it’s not worth the risk.
Q: Are screw-in stakes superior to hammer stakes for canopies?
A: For most camping surfaces, yes. Screw-in auger stakes have a greater contact surface with the soil and withstand pullout force far better than straight stakes, particularly in soft or sandy soils. They also enter without a hammer, which is useful if you have forgotten yours.
Q: My campsite is completely concrete. How do I anchor my canopy?
A: Place commercial weight bags loaded to capacity on each leg. Many event supply businesses and online vendors provide bags rated for 30-40 pounds each bag. You can also use heavy coolers or gear bins placed at each leg base. On concrete, a fully weighted canopy without stakes can withstand mild winds, but will collapse in heavy gusts. On hard terrain, do not rely solely on weight at speeds more than 20 mph.
Q: Will adding sidewalls increase or decrease my canopy’s wind stability?
A: It depends on which side and how they are connected. Sidewalls on downwind and side faces provide structure. A sidewall on the upwind face adds significant wind stress and should be eliminated or left as mesh in windy situations. When in doubt in heavy winds, remove the sidewalls and run with only the canopy top.
Q: Should I use rope or a dedicated guyline cord?
A: Dedicated guy line cord (typically reflective paracord or Dyneema) outperforms conventional rope since it is stronger for its weight, does not stretch as much when wet, and comes pre-threaded with line tensioners. If you already have basic paracord (550 paracord), this is a terrific and cost-effective choice. Avoid bungee cords because they stretch too much to maintain adequate tension.